





|
|






|
|
Service News
|
|
Copyright By FCA Italy S.p.A. - Printed 21/07/2015 - Esc. 1912
|
|
|
Ducato (250)
Version: All versions excluding Natural Power
|
|
|
|
|
1040 1 341 RJ
|
FUEL PUMP IN THE TANK
The engine does not start - Poor performance - Engine warning light switching on - Service Solution
|
|
CLAIMED FAULT
The Customer complains of one or more of the following faults:
-
The engine does not start
-
Poor engine performance
-
Engine control system failure warning light on
According to the model/engine version, analysis with diagnostic equipment may detect presence of error DTC P0090 and/or P0091 - Fuel pressure.
TECHNICAL CAUSE
Condenser burnout inside the pump due to electromagnetic interference.
OPERATIONS AT THE DEALERSHIPS
DEALERSHIP BEHAVIOUR STANDARDS TOWARDS THE CUSTOMER
-
Once the Customer's claimed fault is confirmed, reassure the customer that the fault will be eliminated by replacing the fuel pump submerged in the tank, if necessary, and by adding a dedicated protection circuit in the electric connection harness.
-
After the operation, illustrate what has been done and make sure the Customer is satisfied.
Service Solution
Once the Customer's claimed fault is confirmed, check, and if necessary, replace the fuel pump submerged in the tank, if necessary, and add a dedicated protection circuit in the electric connection harness, according to the following Operating Cycle.
OPERATION CYCLE
Perform the following checks to make sure that the fault is due to the fuel pump:
-
Check that there is fuel in the tank.
-
Check that there are no fuel leaks in the low pressure fuel circuit
-
Check that the supply voltage and the pump draw are correct (refer to tests 1040OA and 1040AB of the Service Manual).
If the fuel pump is faulty, replace it proceeding as described in procedure Op. 1040A70 of the Technical Service Manual. During refitting, interpose the new harness as below described before establishing the electrical connection:
-
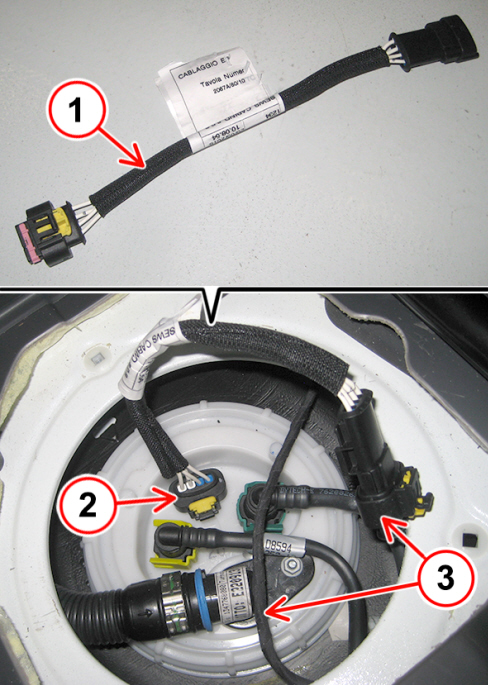
Take the harness part no. 1383673080 (1 – Fig. 1) from the Spare Parts Dpt.
-
Connect one side of the harness to the connector on the pump (2 – Fig. 1) and the other side to the connector coming from the car harness (3).
Fig. 1
-
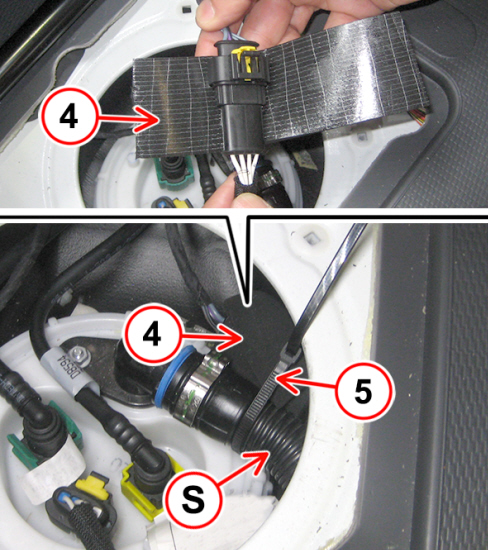
Wrap the harness connection with the connector coming from the vehicle harness (3 - Fig. 1) using a section of adhesive gasket, part no. 1384142080 (4 - Fig. 2).
-
Use a band, part no. 14560187 (5 - Fig. 2), to lock the harness in position on the breather pipe (S), as shown in Fig. 2.

|
Make sure that the cables of the harness and of the car wiring are properly positioned and do not interfere with the access lid; if necessary, protect them with sections of adhesive gasket, part no. 1384142080.
|
Fig. 2
PARTS AVALABILITY
|
All models in question |
Harness |
1383673080 |
1 |
|
All models in question |
Cable ties |
14560187 |
1 (*) |
|
All models in question |
Adhesive gasket |
1384142080 |
1 (**) |
(*) Each pack contains 20 cable ties
(**) Each package contains 2 rolls approx. 100x4 cm, which are enough for no. 8 operations
|
|
Refer to the Parts Catalogue for the pump part no. (for replacement).
|
CLAIM REPORT DATA
|
All models in question |
1040134 |
1 |
RJ |
- |
0.20 |
|
|
The operation code and time refer to the harness interposition operation only. The fuel pump replacement, if necessary, must be determined separately making reference to the Flat Time Rate Manual.
|
|