





|
|




|
|
Service News
|
|
Copyright By FCA Italy S.p.A. - Printed 02/03/2016 – Es.2084
|
|
|
Ducato (250 and 290)
Version: All models with one or two sliding side doors
|
|
|
|
|
7020 1 511 LF
|
SLIDING SIDE DOOR (SSD)
Difficult sliding/locking - Service Solution
|
|

|
Cancels and replaces SN 70.04.14 of 30/04/2014.
|
CLAIMED FAULT
Difficult sliding and/or locking of one or more sliding side door carriages.
OPERATIONS IN PRODUCTION
Adoption of new sliding side door support and sliding devices with improved features.
IMPLEMENTATION OF MODIFICATION
|
All models in question |
Sevel |
- |
2977279 |
3888102 |
OPERATIONS AT THE DEALERSHIPS
DEALERSHIP BEHAVIOUR STANDARDS TOWARDS THE CUSTOMER
-
Once the claimed fault is confirmed, reassure the Customer that it will be eliminated by replacing the sliding side door guides and carriages.
-
After the operation, illustrate what has been done and make sure the Customer is satisfied.
Service Solution
In the presence of a claimed and confirmed fault, it is necessary to check and, where necessary, intervene with restoration/repair of the guides and carriages according to the following Operating Cycle.
OPERATION CYCLE
-
Using a specific support tool (1 - Fig. 1) and a strap (2), remove the sliding side door (3) (refer to procedure 7210L50 of the Service Manual).
Fig. 1 – SSD removal
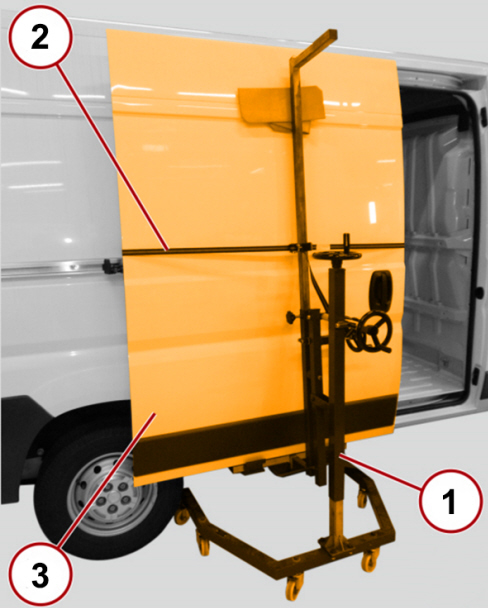
1. Support tool
2. Strap
3. Sliding side door (SSD)
-
Inspect the 3 guides: lower, middle and upper; in particular in the front area and the rear of the lower guide.
-
In case of deformation, restore the correct profile of the lower and upper guides and, if necessary, replace the middle guide with respective gaskets and fixing nuts (refer to procedure 7201C23 of the Service Manual).
|
|
Fig. 2 shows two deformations respectively in the rear area (A) and front (B).
|
Fig. 2 – Deformations of the lower guide
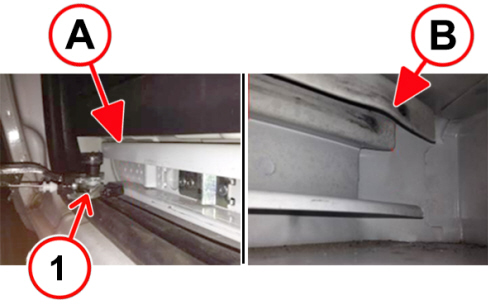
1. Lower carriage out of the guide
A. Rear guide deformation
B. Front guide deformation
-
Inspect the 3 carriages: lower, middle and upper.
-
In case of deformations/breakages to even just one carriage, replace the 3 carriages (upper, middle and lower) as shown in the specific section given below.
|
|
Replace all 3 carriages of the SSD; the partial replacement of only 1 or 2 carriages is not allowed.
|
-
If the carriages conform and do not need replacing, slot the holes on the plate (2 - Fig. 3) fixing the lower carriage (1) to the SSD, respecting the dimensions shown in detail B.
-
Restore the paintwork as indicated in the specific section below.
Fig. 3 – Lower carriage fixing hole slotting
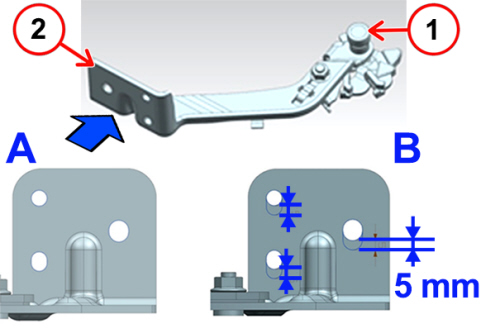
1 - Lower carriage
2 - Plate fixing carriage to SSD
A - Plate (before hole slotting)
B - Hole slotting dimensions
-
If the carriages have to be replaced, before fitting them on the vehicle try to slide the roller (1 - Fig. 4) of the new lower carriage (A) or the rollers (2) of the new upper carriage (B) in their guides, making sure they slide freely along the entire length of the guide, in the straight as well as curved section.
Fig. 4
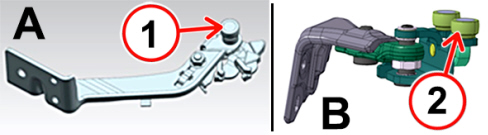
1 - Lower carriage roller
2 - Upper carriage roller
A - Lower carriage
B - Upper carriage
-
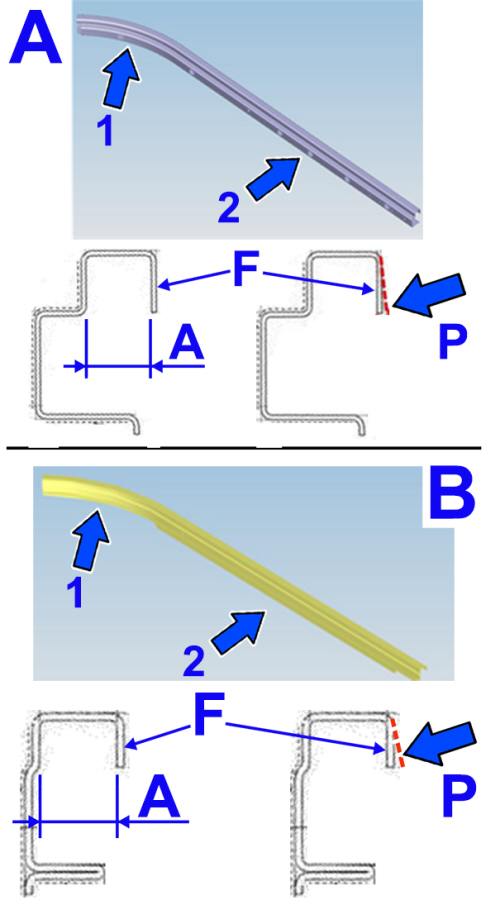
In case of difficulty/jamming in the sliding of the rollers in the guides, widen the tab (F – Fig. 5), ensuring that the section has no deformations/undulations and complying with the values given in the table and in Fig. 5 below.
|
Lower guide int. dimensions (A) (mm) |
21.5 (-0.2/-0.4) |
21.3 -0.1/+0.4 |
|
Upper guide int. dimensions (B) (mm) |
21.5 (-0.2/-0.4) |
21.3 -0.1/+0.4 |
|
Parallelism (P) (both guides) (mm) |
Maximum permitted value: 0.25 (on tab edge) |
Fig. 5 – Dimensions of lower and upper guides
-
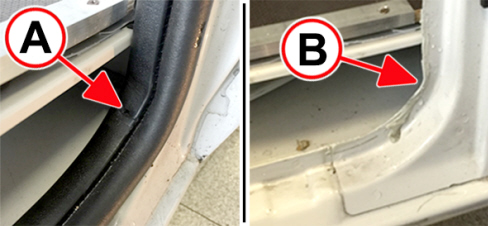
Check for any damage caused by derailment of the carriage and reinstate conformity. Fig. 6 shows two examples of possible damage: breakage of the door opening seal (A) and bending of the tab (B) under the seal.
Fig. 6
Restore paintwork
If necessary (e.g. following repair of the guides, reaming of the holes on the lower carriage bracket, etc.) restore the primer and the enamel, operating as follows:
-
Clean the areas to be painted using a cloth soaked in detergent with low solvent content (e.g. Basf 700-10 or alternative solvents allowed by the environmental protection regulations).
-
Use a brush to apply the 40-50-micron thick corrosion-preventing double-component epoxy primer (e.g. Basf 801-72 or similar).
-
Dry the primer with a dryer for about 10 minutes at a temperature of 60°/70°C.
-
Restore the enamel in the area involved, using a low temperature product (60°C) suitably dried with an IR lamp for about 15 minutes.
Carriage replacement
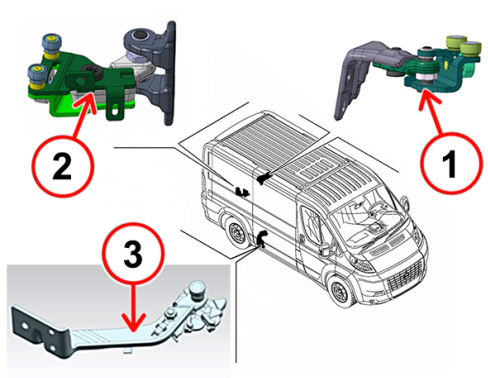
At the end of repairs, replace the 3 support and sliding carriages of the faulty sliding side door by referring to the following procedures of the Service Manual:
-
Op. 7020C13 for the upper device (1 – Fig. 7)
-
Op. 7020C17 for the middle device (2 – Fig. 7)
-
Op. 7020C24 for the lower device (3 – Fig. 7)
After the replacement, check the centring and profiling of the SSD, by referring to procedure 7020C04 of the Service Manual.
Fig. 7
PARTS AVALABILITY
|
All models in question |
Right SSD upper carriage |
53347744 |
1 |
|
All models in question |
Left SSD upper carriage |
53347748 |
1 |
|
All van and half-window models in question |
Right SSD middle carriage |
53347745 |
1 |
|
All windowed models in question |
Right SSD middle carriage |
53347746 |
1 |
|
All van and half-window models in question |
Left SSD middle carriage |
53347749 |
1 |
|
All windowed models in question |
Left SSD middle carriage |
53347750 |
1 |
|
All models in question |
Right SSD lower carriage |
53347747 |
1 |
|
All models in question |
Left SSD lower carriage |
53347751 |
1 |
|
All short wheelbase models in question |
Right SSD middle guide |
1385340080 |
1 |
|
All short wheelbase models in question |
Left SSD middle guide |
1385342080 |
1 |
|
All medium and long wheelbase models in question |
Right SSD middle guide |
1385341080 |
1 |
|
All medium and long wheelbase models in question |
Left SSD middle guide |
1385343080 |
1 |
|
All models in question |
Seal |
1361907080 |
6 (*) |
|
All models in question |
Middle guide fixing nut |
14039614 |
6 (*) |
(*) Each pack contains 5 components
CLAIM REPORT DATA
|
All models in question |
7020151 (a) |
1 |
LF |
010 - 090 |
1.10 (a) |
|
All models in question |
7020152 (b) |
1 |
LF |
010 - 090 |
1.20 (b) |
|
All models in question |
7020153 (c) |
1 |
LF |
010 - 090 |
1.40 (c) |
|
All models in question |
7020154 (d) |
1 |
LF |
010 - 090 |
1.50 (d) |
• (a) Operation Code and time for the following operations
- Removal/refitting SSD and carriages with centring and profiling
- Restoration of lower/upper guides
- Replacement of carriages and adaptation of guides tabs
• (b) Operation Code and time for the following operations
- Removal/refitting SSD and carriages with centring and profiling
- Restoration of lower/upper guides
- Replacement of carriages and adaptation of guides tabs
- Replacement of middle guide
• (c) Operation Code and time for the following operations
- Removal/refitting SSD and carriages with centring and profiling
- Restoration of lower/upper guides
- Reaming lower carriage plate holes and paintwork restoration.
• (d) Operation Code and time for the following operations
- Removal/refitting SSD and carriages with centring and profiling
- Restoration of lower/upper guides
- Replacement of middle guide
- Reaming lower carriage plate holes and paintwork restoration.
|
|
Any repairs for damage due to faults relevant to SSD carriages/guides must be coded separately according to the repair times taken.
|
|