Copyright By FCA Italy S.p.A. - Printed 27/01/2016 – Esc.1867
Ducato (250 and 290)
Version: All Chassis Cab and Chassis Cowl versions
70
002.16
7210 1 541 BE
BAFFLE WITH AIR OUTLET TRIM/PLUG Cracking on one or both baffles - Service Solution
CLAIMED FAULT
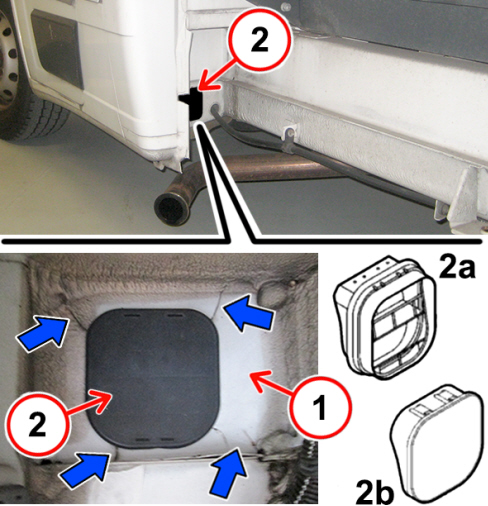
Cracking found on one or both baffles (1 – Fig. 1) with air outlet trim/plug (2).
Depending on the version/fitting out, the vehicles may be equipped with baffles with air outlet trims (2a) or plugs (2b).
Fig. 1
OPERATIONS IN PRODUCTION
Baffle material changed, thickness increased and new air outlet trims/plugs used.
IMPLEMENTATION OF MODIFICATION
Version
Plant
Linea
Chassis no.
Organisation no.
All models in question
Sevel
-
2762855
3690238
OPERATIONS AT THE DEALERSHIPS
DEALERSHIP BEHAVIOUR STANDARDS TOWARDS THE CUSTOMER
Once the claimed fault is confirmed, reassure the Customer that the problem can be solved by replacing the baffle and relative air outlet trim or plug with a new improved one.
After the operation show the Customer what has been done and make sure he is satisfied.
Service Solution
Where the presence of cracking has been confirmed, replace the baffle and relative air outlet trim or plug as described in the following operating cycle.
OPERATION CYCLE
Preliminary operations
Turn the ignition key to the STOP position and remove it.
Remove the battery cover (Op. 5530B54) and disconnect the battery negative terminal.
Position the vehicle on the lift.
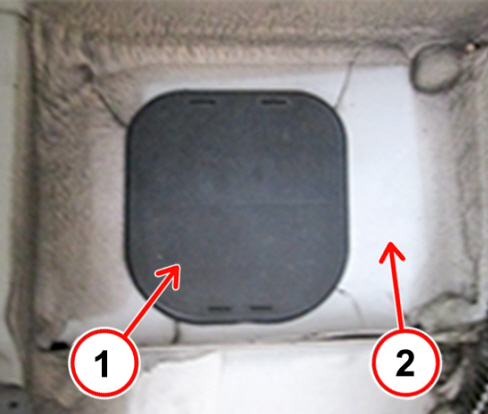
Release and remove the air outlet trim or plug (1 – Fig. 2) from the baffle (2).
Fig. 2
Removing the baffle
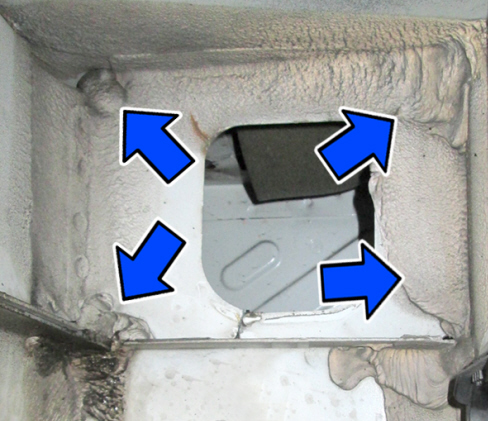
Use a hot-air gun to heat the sealant around the perimeter of the baffle to soften it. Then remove the sealant using a spatula or scraper. (Fig. 3).
Fig. 3
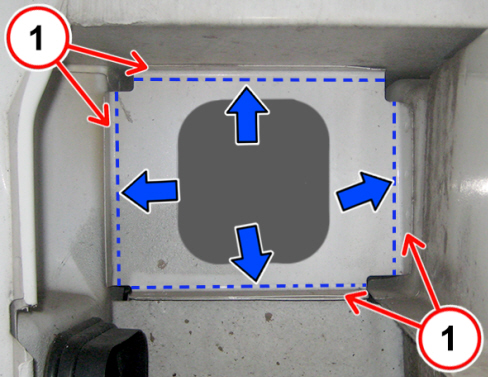
Use a jigsaw to cut the baffle close to the edges welded to the body (dashed line shown in Fig. 4) and remove it.
Detach the side edges (1 - Fig. 4) by using a hammer and chisel on the welds.
Fig. 4
Use a grinding disc and rotary brush to remove the remainder of the welds and clean up the whole perimeter around the baffle housing.
If necessary, correct any distortion to the panel using a mallet and dolly block.
Suitably vacuum clean all the grinding residues and the brushing chips.
Clean the whole perimeter around the baffle housing using a cloth soaked in detergent with a low solvent content (e.g. Basf 700-10 or alternative solvents permitted by the regulations in force as for environmental protection).
Apply an electroweldable protective zine coating (e.g. 3M 50410, or equivalent) along the whole frame housing.
Get a new baffle from the Spare Parts Department and position it correctly, then mark its position on the surrounding metalwork with a marker pen or scriber.
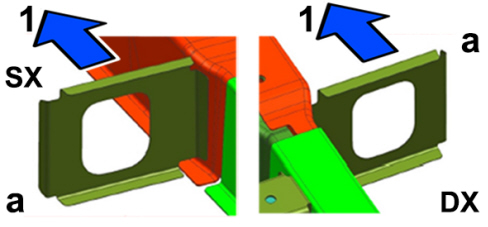
The correct orientation of the baffle is with the external fin (a – Fig.5) pointing towards the front and the hole for the air outlet trim or plug offset outwards.
Fig. 5
1 – Direction of travel
a – Baffle external fin
LH - Baffle installed on the left side
RH - Baffle installed on the right side
Preparing the new baffle
Sand the whole surface (both sides and the edges) of the baffle with dry P220 sandpaper.
Blow by compressed air.
Clean using a cloth soaked in detergent with a low solvent content (e.g. Basf 700-10 or alternative solvents permitted by the regulations in force as for environmental protection).
Spray both sides and the edges with a two-part epoxy anticorrosion primer (e.g. Basf 801-72 or equivalent) to a thickness of 40-50 microns.
Dry the two-part primer for about 30 minutes at a temperature of 60°C using an infrared lamp.
Remove the epoxy primer from the areas on the edges that will be welded (Fig. 6).
Installing the new baffle
Position the new baffle, referring to the marks made previously.
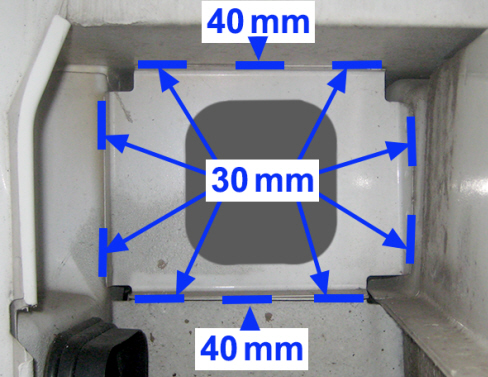
Use a seam welder to weld the baffle, with the seams for each side as shown in Fig. 6.
The length of each seam is about 30 mm except for the two central seams on the horizontal edges that are about 40 mm.
Compulsorily use a fume extractor during the seam welding operations.
Fig. 6
Level the welding with a disc grinder and clean the welded areas using a rotary brush.
Suitably vacuum clean all the grinding residues and the brushing chips.
Clean the areas to be processed using a cloth soaked in detergent with a low solvent content (e.g. Basf 700-10 or alternative solvents permitted by the regulations in force as for environmental protection).
Spray the areas to be welded with the two-part epoxy anticorrosion primer (e.g. Basf 801-72 or equivalent) to a thickness of 40-50 microns.
Dry the two-part primer for about 30 minutes at a temperature of 60°C using an infrared lamp.
Apply a bead of one-part polyurethane sealant 3M 8851 or equivalent along the whole perimeter.
Then paint the same colour as the bodywork and dry for about 30 minutes at a temperature of 60°C using an infrared lamp.
Apply the protective waxy oil along the internal perimeter of the baffle using a probe through the central hole.
Final operations
Mount a new air outlet trim or plug (2a or 2b – Fig. 1) on the baffle.
With the new thicker baffles it is necessary to use specific new trims or plugs. Do not use the trims/plugs removed previously.
Lower the car and remove it from the lift.
Connect the battery negative terminal and re-install the battery cover (Op. 5530B54).
For the use of chemicals closely follow the instructions and warnings on the safety sheet that the supplier must give the user in accordance with the laws in force in the area (for Italy in accordance with Legislative Decrees 52/97 and 65/03 and subsequent modifications and additions).