|
The radio has been designed with the specific acoustic features of the passenger compartment in mind and to be integrated with the design of the dashboard.
It is in an ergonomic position for both the driver and the passenger and is user friendly thanks to the small number of controls that can be immediately identified.
The audio system, in its most complete version, consists of:
-
radio;
-
supply cables;
-
aerial;
-
2 tweeters, located in the front pillars;
-
2 mid-woofers, located in the front doors;
-
2 full-range speakers, located in the rear side panels (people carrier versions).
DESCRIPTION OF THE CONTROLS
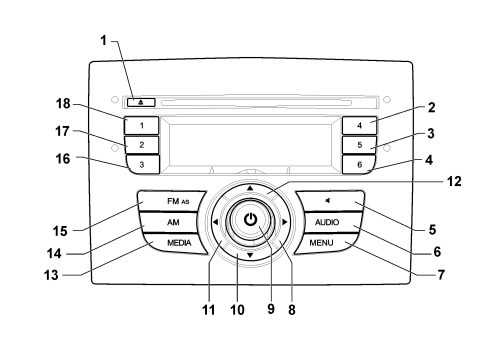
1. Compact Disc eject button (EJECT)
2. Function selection button (4):
3. Function selection button (5):
4. Function selection button (6):
5. “Mute”/“Pause” function on/off button
6. Audio functions selection button (AUDIO): low tones (BASS), high tones (TREBLE), RH/LH balance (BALANCE) and front/rear balance (FADER)
7. Advanced functions adjustment button (MENU)
8. Audio functions adjustment button - Menu
9. Radio on/off button (short press) - Volume adjustment (knob rotation)
10. Audio functions selection button - Menu
-
manual radio station search
-
play next MP3 folder (for CD-MP3)
-
select next MP3 folder/artist/genre/album depending on which selection mode is active (only Blue&Me versions)
11. Audio functions adjustment button - Menu
12. Audio functions selection button - Menu
-
manual radio station search
-
play previous MP3 folder (for CD-MP3)
-
select previous MP3 folder/artist/genre/album depending on which selection mode is active (only Blue&Me versions)
13. CD/Media Player source selection button (MEDIA) (only Blue&Me versions)
14. Radio frequency range (MW1, MW2) selection button (AM)
15. Radio frequency range (FM1, FM2, FM)) selection button (FM - AS) - Automatic storage (AS - Autostore)
16. Function selection button (3):
17. Function selection button (2):
18. Function selection button (1):
RADIO TECHNICAL INFORMATION
The radio is protected by a fuse located in the junction unit under the dashboard.
See E3510 RADIO
Power section
The electrical specifications are in the table below.
|
Number of output channels |
4 |
|
Power output |
30 W |
Radio-receiver
The functional specifications are in the table below.
|
Type of tuner |
PLL quartz |
|
Frequency bands |
FM |
|
AM |
|
MW |
|
RDS functions |
AF (Alternative Frequency) |
|
|
TP (Traffic Programme) |
|
|
TA (Traffic Announcements) |
|
|
EON (Enhanced Other Networks) |
|
|
REG (Regional Program) |
|
Tuning search modes |
Manual / Automatic |
|
Radio stations tuning |
30 (18 FM + 12 MW) |
|
Automatic stereo/mono scanning |
YES |
|
Speed volume function |
YES |
|
AUTOSTORE |
6 stations in the dedicated FM band |
Cd player
The specifications of the CD player are described in the table below.
|
Type of supports |
CD audio / CD-R / CD-RW |
|
Previous / next track |
YES |
|
Rapid search |
YES |
|
Direct selection of the disc |
YES |
|
CD display function |
Display of disc name/time elapsed |
|
MP3 |
YES (on versions with CD-MP3) |
Other functions
The technical specifications are listed below.
|
CD changer control setup |
YES |
|
Remote control setup |
YES |
|
Hands free phone setup |
YES |
|
Automatic volume adjustment dependent on the speed |
YES (via CAN) |
|
Logistic mode |
YES (via CAN) |
|
Display dimming at + lights |
YES |
RADIO CONNECTORS PIN OUT
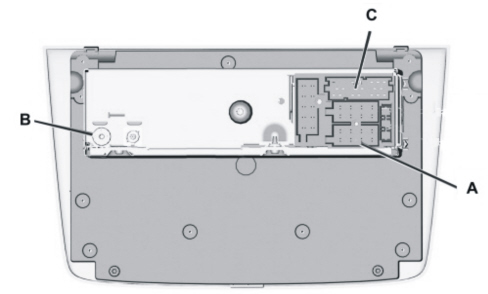
Connector A
|
A1 |
B-CAN B |
|
A2 |
NC |
|
A3 |
B-CAN A |
|
A4 |
(+30) supply from F39 of the CPL |
|
A5 |
Aerial on mirror supply |
|
A6 |
Lighting (+ lights) |
|
A7 |
Ignition-operated (+15) supply from F49 of the CPL |
|
A8 |
Earth |
|
B1 |
(+) Right rear speaker for Transformer Socket |
|
B2 |
(-) Right rear speaker for Transformer Socket |
|
B3 |
(+) Front right tweeter and speaker in the front right door |
|
B4 |
(-) Front right tweeter and speaker in the front right door |
|
B5 |
(+) Front left tweeter and speaker in the front left door |
|
B6 |
(-) Front left tweeter and speaker in the front left door |
|
B7 |
(+) Left rear speaker for Transformer Socket |
|
B8 |
(-) Left rear speaker for Transformer Socket |
Connector B
Connector C (for versions with radio controls on the steering wheel)
|
1 |
Left AUX signal |
|
2 |
Right AUX signal |
|
3 |
AUX earth |
|
4 |
NC |
|
5 |
NC |
|
6 |
NC |
|
7 |
Tel audio IN (+) |
|
8 |
Tel audio IN (-) |
|
9 |
Tel MUTE |
|
10 |
Signal A Remote controls on the steering wheel (MUTE, VOL + VOL -) |
|
11 |
Signal B Remote controls on the steering wheel (SOURCE, SCAN +, SCAN -) |
|
12 |
Earth |
|
13 |
NC |
|
14 |
NC |
|
15 |
NC |
|
16 |
NC |
|
17 |
NC |
|
18 |
NC |
|
19 |
NC |
|
20 |
NC |
AUDIO SETTINGS
The functions in the audio menu differ according to the activated source: AM / FM / CD or CD-MP3 / Media Player (versions with Blue&Me™).
To change the audio functions press briefly the AUDIO button, then scroll through the functions with buttons (12) and (10), and change the setting of the selected function with buttons (11) or (8).
The wording regarding the current status of the selected function appears on the display.
The functions managed by the menu are:
-
BASS - bass adjustment;
-
TREBLE - treble adjustment;
-
BALANCE - right/left balance adjustment;
-
FADER - front/back balance adjustment;
-
LOUDNESS - activation/deactivation of the function for improving sound at low volume;
-
EQUALISER - activation and selection of factory-set equaliser levels;
-
USER EQUALISER - customised equaliser values setting.
To activate the advanced functions press briefly the MENU button, then scroll through the functions with buttons (12) and (10), and change the setting of the selected function with buttons (11) or (8).
The functions managed by the menu are:
-
AF SWITCHING (ON/OFF) - search for alternative frequencies active (ON) or not active (OFF);
-
TRAFFIC INFORMATION (ON/OFF) - information about traffic conditions, when it is active (ON) icon TA appears on the display;
-
REGIONAL MODE (ON/OFF) - automatic search of broadcasters with regional programmes;
-
MP3 DISPLAY - setting of information that can be displayed about MP3 tracks (ID3-TAG);
-
SPEED VOLUME (ON/OFF) - vehicle speed-dependent automatic volume control;
-
RADIO ON VOLUME (ON/OFF) - activation/deactivation of maximum volume limit when turning the radio on;
-
EXTERNAL AUDIO - telephone volume adjustment;
-
RADIO OFF - radio switching off mode setting (“00 MIN” or “20 MIN”);
-
SYSTEM RESET (NO/YES) - reset of factory settings.

|
The AF SWITCHING, TRAFFIC INFORMATION and REGIONAL MODE adjustments are only possible in FM mode.
|
RADIO
When the equipment is switched on, the last function selected before it was turned off will be tuned into (Radio or Compact Disc).
To select the Radio function when another audio source is being listened to, press the FM/AM buttons briefly and repeatedly depending on the desired band.
Selection of the frequency band
In the Radio mode, press the FM or AM button briefly and repeatedly to select the desired reception band.
Each time the button is pressed "FM1", "FM2", "FMA" bands are cyclically selected with FM button; while "MW1" and "MW2" bands are cyclically selected with AM button.
FMA band is reserved for broadcasters stored automatically using the Autostore function.
The radio is always prepared for receiving stations in RDS (Radio Data System) mode, this function cannot be deactivated.
Autostore function (automatic programming of stations)
To activate the Autostore (automatic storage) function, hold the FM button pressed until a beep is heard. When this function is active, the radio automatically stores stations with the strongest signal in decreasing order of signal intensity within the FMA frequency band.
Radio off function (switching-off mode)
This function is used to select the mode for switching off the radio between two different procedures.
The chosen mode appears on the display:
-
"00 MIN": switching off dependent on the ignition key. The radio switches off automatically as soon as the key is turned to the OFF position;
-
"20 MIN": switching off independent of the ignition key. The radio remains on after the key has been turned to the OFF position for a maximum time of 20 minutes.
COMPACT DISC PLAYER (CD)
Selection of the compact disc player
To activate the Compact Disc player incorporated in the equipment, when a CD is already inserted, switch the equipment on, then press the MEDIA button briefly and repeatedly to select the "CD" operating mode.
Cd insertion/ejection
To load the CD, insert it gently into the slot to activate the motorised loading system, which will position it correctly.
Press the button (1), with the equipment on, to activate the motorised CD ejection system.
After ejection, the radio will return to the source listened to before the CD was played.
The CD cannot be ejected if the equipment is switched off.
Error messages
If the CD inserted cannot be read, the message "CD Disc error" will appear on the display for 2 seconds, then the CD will be ejected and the source activated before the CD mode was selected will be restored.
If the CD player overheats playback could be temporarily interrupted. The radio automatically switches to the Radio mode and the display shows “CD hot” and then “CD Disc error”.
Track selection (forward/back)
Press button (8) briefly to play the next track on the CD and button (11) to play the previous track.
If the reproduction of the track has started more than 3 seconds ago, on pressing button (11) the track will be played again from the beginning. In this case, if you want to play the previous track, press the button twice consecutively.
Fast forward/back track selection
Keep button (8) pressed to fast forward through the track selected and keep button (11) pressed to fast rewind through the track.
The fast forward/rewind function is interrupted when the button is released.
If the CD name display function has been selected from the menu, it will be replaced by the CD time display function.
Around 2 seconds after the last activation of the button the name of the CD will be displayed once again.
Pause function
To pause the CD player, briefly press button (5). Volume will progressively decrease and the display will show "CD Pause".
To resume listening of the track, press button (5) again.
CD MP3 PLAYER
This section only describes the variants regarding the operation of the CD MP3 player: as far as the operation of the radio is concerned, refer to the previous description in paragraph "COMPACT DISC PLAYER (CD)".
Mp3 mode
In addition to playing normal audio CDs, the car radio is also capable of playing CD-ROMs on which MP3 format compressed audio files are recorded.
The radio works according to the methods described previously ("Radio with CD player") when an audio CD is inserted.
To guarantee optimum reproduction it is advisable to use good quality master products at the lowest possible speed.
The files on an MP3 CD are structured in folders, creating lists of all the folders containing MP3 tracks (folders or subfolders are all on the same level) and folders that do not contain MP3 tracks cannot be selected.
The operating conditions and specifications for playing MP3 files are as follows:
-
the CD-ROMs used should be burnt according to ISO 9660 standard;
-
the music files must have an ".mp3" extension: files with a different extension cannot be played;
-
the following sampling frequencies can be played: 44.1 kHz, stereo (96 to 320 kbit) - 22.05 kHz, mono or stereo (32 to 80 kbit);
-
tracks with a variable bit-rate can be reproduced.

|
The names of tracks must not contain the following characters: spaces, ' (apostrophes), ( and ) (open and close brackets).
|
During the writing of a CD MP3, make sure that the names of the files do not contain these characters; otherwise the radio will not be able to play the tracks involved.
Folder name shown on display
The name of the MP3 folder shown on the display corresponds to the name with which the folder was stored on the CD, followed by an asterisk.
Track name shown on display
There are two possible ways of naming an MP3 track.
If the track selected has an ID3-TAG, the name of the MP3 track will be created in the following way:
-
the first part of the track name corresponds to the track memorised on the ID3-TAG, followed by an asterisk;
-
the second part of the track name corresponds to the name of the artist memorised on the ID3-TAG, followed by an asterisk.
If the track selected does not have an ID3-TAG, the name of the track (without and "MP3" extension) corresponds to the name of the file through which the CD track is memorised, followed by an asterisk.
Selecting next/previous folder
Press button (12) to select the next folder or press button (10) to select the previous folder.
The name of the selected folder will be shown on the display.
The folders are selected cyclically: the first folder is selected after the last folder and vice versa.
If no other folder/track is selected in the next 2 seconds, the first track on the new folder will be played.
If the last track in the folder currently selected is played, the next folder will be played.
CAR RADIO AERIAL
There are two types of radiofrequency aerial:
ANTI-THEFT PROTECTION
The radio is equipped with an anti-theft protection system based on the exchange of information between the radio and the electronic control unit (Body Computer) present on the vehicle.
This system guarantees maximum safety and prevents the secret code from being entered after the radio power supply has been disconnected.
If the result of the check is positive, the equipment will start to work, whilst if the codes compared are not the same or if the radio is connected for the first time to the vehicle, the equipment will notify the user of the need to enter the secret code following the procedure described in the paragraph below.
The equipment will not work until the correct code has been entered.
The protection system means that the radio cannot be used if it is taken out of the dashboard and stolen.
Entering the password
The secret code must be entered for the radio to work after the initial connection to the vehicle's electrical system or to a different Body Computer from the original one.
When the radio is connected to the vehicle power supply, the word "Radio code" will appear on the display for about 2 seconds followed by four dashes "- - - -".
The secret code is made up of four digits from 1 to 6, each corresponding to one of the dashes.
To enter the first digit of the code, press the button corresponding to the pre-selected stations (from 1 to 6). Enter the other code digits in the same way.
If the four digits are not entered within 20 seconds, the display shows the text "Enter code - - - -" for a few seconds.
If this occurs, it is not considered an incorrect code entry.
After entering the fourth digit (within 20 seconds), the radio will start to operate.
If an incorrect code is entered, the radio will emit a sound and the display shows the words "Radio blocked/wait" to notify the user of the need to enter the correct code.
Once the user enters an incorrect code, the waiting time gradually increases (1 min, 2 min, 4 min, 8 min, 16 min, 30 min, 1h, 2h, 4h, 8h, 16h, 24h) to a maximum of 24 hours.
The waiting time will be shown on the display by "Radio blocked/wait".
After the writing has disappeared it is possible to start the procedure of entering the code again.
Code card
This document certifies ownership of the car radio.
The Code Card shows the radio model, serial number and secret code.
STEERING WHEEL CONTROLS
One of the options available for the radio is controls on the steering wheel which replicate the main radio functions.
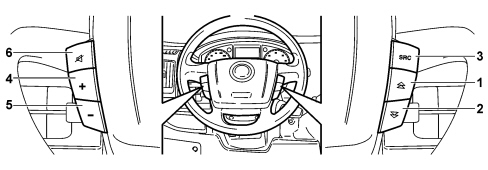
Volume adjustment
Press the "+" button (4) to increase the volume or the "-" button (5) to decrease it, in the desired mode.
This function is identical to the one for the knob on the radio.
Mute/pause function selection
Press the "MUTE" button (6) to activate/deactivate the function which automatically reduces volume to zero.
If this function is active, the display shows "Radio Mute" when in radio mode or “PAUSE” when in CD/CD-MP3 or Media Player mode (for versions with Blue&Me).
This function is identical to the one for the "MUTE/PAUSE" control on the radio.
Function selection
Press button "SRC" (3) repeatedly to select the Radio frequency ranges or the CD/CD-MP3 (if on) or Media Player (for versions with Blue&Me) audio sources cyclically.
Adjusting the seats
Buttons (1) and (2) activate different functions depending on the operating mode selected using the "SRC" button (3) (Radio or CD/CD-MP3).
The functions for these buttons are identical to the ones for the controls on the radio, relating to the functions listed below:
1 - Radio function: tuning adjustment to search for stations in the selected band.
2 - CD/CD-MP3 function: function for selecting the next (1) or previous (2) CD/CD-MP3 track.
If the reproduction of the track has been started for more than 3 seconds, the track will be played again.
BLUE&ME SYSTEM
The vehicle is available, on request, with a telematic system that allows the use of applications for communication and entertainment (mobile phone, PDA, etc.) designed for use in the vehicle in a way that is comfortable, simple and safe.
The system known as “Blue&MeTM” requires the presence of the car radio system and the Convergence Node control unit to produce its functions using Bluetooth technology.
Thanks to its complete integration with the voice commands, the controls on the steering wheel (where present) and the information in the on board multifunction display, the Blue&MeTM system allows the use of a mobile phone with Bluetooth without ever having to take your hands off the steering wheel, keeping the mobile phone where you prefer in the cab, without connecting it to any connector.
A fundamental feature of the application is the hands-free communication with voice recognition which allows phone calls to be made and received using voice commands or, alternatively, the manual controls on the radio front panel.
The system can be updated and its functions extended through additional services that will become available in the future.
On this version the Blue&MeTM system is composed of:
-
Convergence node (Blue&MeTM module);
-
Hands-free microphone built-into the centre front courtesy light, with a mounting and screened connecting cable (incorporated in the vehicle wiring);
-
Radio;
-
USB module (optional), composed of an external connector with connecting cables between the connector and the Convergence node;
-
Instrument panel multifunction display.
System components
The system components are illustrated in the figure below.
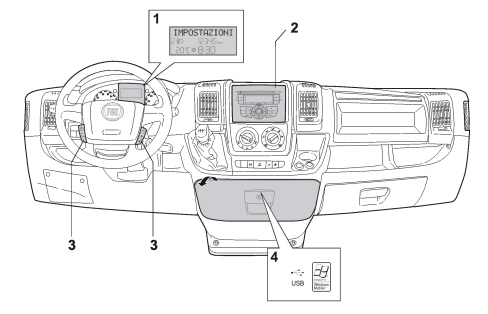
1 - Multifunction display
2 - Radio
3 - Control buttons on the steering wheel
4 - USB port
There is also a hands-free microphone incorporated in the centre front courtesy light.
Display
The different options on the Blue&MeTM Main Menu are shown on the control panel multifunction display.
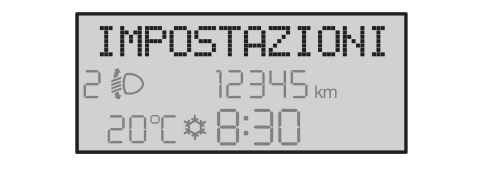
The following types of information displayed are:
-
mobile phone status information;
-
correct connection with the mobile device;
-
failed connection with the Bluetooth device;
-
name of the service provider activated on the mobile phone (if not available "- - - - - - -" is displayed);
-
information relating to the audio track being listed to through the multimedia player;
-
information relating to the Blue&MeTM function activated or the menu option displayed.
Radio
The telephone/multimedia player volume is adjusted through the radio controls. The buttons used are the same ones used for adjusting the same radio settings.
Specifically:
-
MUTE : Activation/deactivation of multimedia player pause function;
-
VOL + / VOL - : Adjustment of audio volume for Blue&MeTM functions (hands-free, multimedia player, voice announcements).
On versions where present, the buttons on the steering wheel can be used for the same functions.
USB port
There is a USB port in the centre oddments compartment. By connecting a special device with that connection (USB drive) it is possible to play your own music files through the “Multimedia player” function.
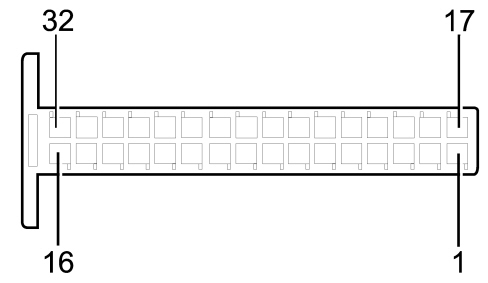
Convergence node pin-out
The connector for the Convergence Node is illustrated in the figure below.
|
1 |
Not connected |
|
2 |
Not connected |
|
3 |
Multimedia player USB signal (D+) |
|
4 |
Multimedia player USB earth |
|
5 |
Left AUX signal (Multimedia player) |
|
6 |
Not connected (Tel out - GND setup) |
|
7 |
Audio signal (+) |
|
8 |
Signal from hands-free microphone |
|
9 |
Not connected |
|
10 |
Not connected |
|
11 |
Not connected |
|
12 |
Not connected |
|
13 |
Not connected |
|
14 |
B-CAN A (low) |
|
15 |
Earth |
|
16 |
Power supply (+30) |
|
17 |
Not connected |
|
18 |
Not connected |
|
19 |
Multimedia player USB signal (D-) |
|
20 |
Multimedia player USB power supply (+5 V) |
|
21 |
AUX earth (Multimedia player) |
|
22 |
Right AUX signal (Multimedia player) |
|
23 |
Audio signal (-) |
|
24 |
Microphone signal cable screening |
|
25 |
Mute Tel signal |
|
26 |
Not connected |
|
27 |
Not connected |
|
28 |
Not connected |
|
29 |
Not connected |
|
30 |
B-CAN B (high) |
|
31 |
USB (SHIELD) |
|
32 |
Power supply (+15) |
System functions
HANDS-FREE TELEPHONE
The hands-free telephone works as follows:
Following an incoming call:
-
when a signal of an incoming call reaches the phone the radio is turned to mute, the ringing of the mobile phone is produced through the radio system speakers and the number/name of the caller (if available) is shown on the instrument panel display;
-
at this point the user can accept or reject the call;
-
during the conversation the user listens to the other person on the radio audio system and speaks via the hands-free microphone;
-
when the conversation is over the radio returns to its status prior to the call (volume, mode, etc.).
When a conversation is in progress, the user can carry out the following operations:
-
alter the volume of the conversation using the radio Vol + and Vol - buttons. The level set is reset at the end of the conversation: the next one will be at the radio default volume of the radio;
-
move the conversation in progress from the Convergence control unit to the mobile phone (and vice versa) to speak in private (local privacy);
-
momentarily interrupt the conversation with the remote user (keeping him/her on hold) in order to speak privately with the passenger on board the vehicle without the caller on the line being able to hear (remote privacy);
-
answer another incoming call and pass from one call to another;
-
refuse an incoming call.
|
|
The functions that allow a second incoming call to be rejected or answered are linked to the presence on the GSM network, the user profile and the mobile phone of the necessary specifications and authorisations to manage 2 calls simultaneously.
|
There are 4 ways of making a phonecall:
-
Calling a name in the phonebook;
-
Calling a number using voice commands;
-
Calling a number using the mobile phone keypad;
-
Calling one of the last dialled numbers.
MULTIMEDIA PLAYER
The Blue&MeTM multimedia player (Media Player) makes it possible to play digital audio stored on a USB device via the vehicle sound system simply by connecting it to the USB port on the vehicle.
The following operations can be carried out using the multimedia player:
-
Reproduction of audio files. Files in mp3, wma, wav format can be reproduced. Reproduction can also take place using a playlist in m3u or wpl formats.
-
Reproduction of audio files by category. It is possible to reproduce all digital audio that belongs to a certain category, for example an album, an artist or a musical genre.
-
Use the reproduction functions. It is possible, whilst playing tracks, to use certain functions such as Play, Stop, Next track, Previous track, Random and Continuous play.
|
|
The multimedia player does not support audio files compressed with other formats (e.g. aac) or DRM protected audio files (Digital Right Management). If there are unsupported audio files on the USB device they will be ignored.
|
Using the multimedia player
To use the multimedia player, simply connect your USB device (directly or with an extension) to the USB port in the vehicle. When the ignition key is turned to MAR-ON, Blue&MeTM starts to produce the index of the multimedia library.
At the end of the operation you can navigate within the entire library and scroll through the categories using the controls on the front panel / steering wheel or the voice commands.
|
|
If the USB device contains a lot of files, the creation of the library may take several minutes.
|
After you have selected the file you want to listen to the vehicle audio system will reproduce it.

|
The USB port to be used for the reproduction of multimedia files is the optional one located in the centre oddments compartment. The integrated socket at the side of the Blue&Me module is designed exclusively for diagnostic/programming/updating functions.
|
Servicing operations
FAULT DIAGNOSIS
The control unit is connected via the B-CAN to the radio node and the Body Computer; therefore the diagnostic activities are carried out, in the same way as for all the other CAN "nodes", via the special diagnostic socket and the Examiner equipment.
For other types of repair operations to the system, a special operating system must be temporarily installed on the Examiner, following the instructions given below and a USB drive must be inserted in the special control unit socket.
Alternatively, these operations can be carried out using a personal computer provided with "Windows XP" or "Windows 2000" operative system.
|
|
The USB drive to be used should have the following specifications: USB standard version 1.0, 1.1 or 2.0 with a minimum memory of 256 MB and full compatibility with WINDOWS XP or WINDOWS 2000.
|
|
|
Whilst this USB drive is being used for the above mentioned operations, it will be formatted and therefore all data stored in it previously will be lost.
|
For all functions that require the use of a USB drive, the USB port integrated in the module must be used and not the one located in the oddments compartment (designed for the multimedia player).
The following operations can be carried out using the Examiner (with the specific additional software installed):
-
Language change;
-
Software update.
Language change
As far as the messages shown on the display are concerned, the language selected is the one set for the control panel.
See descriptions 5560B
As far as the voice recognition and text to speech messages are concerned, the language should be set separately using the Examiner diagnostic equipment, using a USB drive to be inserted in the special control unit socket.
Software update
Any control unit software updates should be carried out using the Examiner diagnostic equipment with a USB "drive" to be inserted in the special control unit socket.
|
|
Never disconnect the battery terminals during the software updating or language updating procedure.
|
Control unit replacement
The battery terminals must be disconnected before removing the control unit.
The telephone list downloaded onto the Convergence control unit is only saved to the RAM, which means that if the battery is disconnected all phone lists downloaded up to that time will be immediately lost.
Order a new control unit from the Parts Dept. A pristine component will be sent: once fitted, the initial default data must be transferred to it by carrying out the "PROXI ALIGNMENT" procedure using the Examiner.
Once a new control unit is installed it is necessary to:
Carrying out operations using the Examiner
To carry out the language change operations for voice messages and software updating, a special operating system must be temporarily installed on the Examiner, using the special "WINDOWS MOBILE FOR AUTOMOTIVE EXAMINER CD" CD-ROM supplied together with the traditional Examiner software updates.
In addition, as already pointed out, a USB drive is required for transferring the data to the system control unit.
Always follow the sequence described below (for all of the operations):
-
switch on the Examiner following the traditional operating methods;
-
insert the "WINDOWS MOBILE FOR AUTOMOTIVE EXAMINER CD";
-
switch off the Examiner;
-
insert the USB "pen" in the special port at the back of the Examiner;
-
restart the Examiner.
|
|
The USB drive is NOT "recognised" if it is inserted with the Examiner on.
|
At this point the Examiner will work temporarily with the special operating system and it is capable of transferring the data necessary for the following operations to the USB drive:
-
single language setting;
-
multi language setting;
-
software update.
|
|
Only one of these three operations can be selected at a time. To carry out two operations on the same system (e.g. language change and software update), the instructions given must be repeated two separate times.
|
At this point the USB drive must be placed in the vehicle and, with the ignition OFF, inserted in the special port in the Convergence control unit. Then turn the ignition key to MAR-ON.
The control unit will carry out the operation requested (language change or software update). At the end a display message in the control panel will advise that the operation is over. Check that the operation has been successful (e.g. check the voice message language by giving an instruction).
|
|
Never disconnect the vehicle battery terminals during any of the operations indicated.
|
Warnings on the use of the system software
This system contains software licensed by Fiat Group Automobilies S.p.A. according to a license agreement. Any removal, reproduction, reverse engineering, or other unauthorised use of the software for this system in violation of the license is strictly prohibited. For more details, consult the owner's handbook.
-
Microsoft Windows, Windows XP, Windows 2000 are registered trade marks of the Microsoft Corporation.
-
Bluetooth is a registered trade mark of Bluetooth SIG, Inc.
|