





|
|






|
|
Service News
|
|
Copyright By FCA Italy S.p.A. - Printed 18/09/2017
|
|
|
Ducato (250 and 290)
Version: All models
|
|
|
|
|
7210 1 331 BC
|
FRONT DOOR A-PILLAR
Pillar trim lining cracking in the door stay fastener area - Service Solution
|
|

|
Cancels and replaces SN 70.05.11 of 06/05/2011 for validity extension to Ducato FL (290).
|
CLAIMED FAULT
Cracking/breakage of the pillar lining in the area surrounding the stay fastener of the front RH and/or LH door.
OPERATIONS AT THE DEALERSHIPS
DEALERSHIP BEHAVIOUR STANDARDS TOWARDS THE CUSTOMER
-
Once the claimed fault is confirmed, reassure the Customer that the fault will be solved by placing a reinforcement plate next to the LH and/or RH door stay fastener area.
-
After the operation show the customer what has been done and make sure they are satisfied.
Service Solution
Once the claimed fault is found, place a reinforcement plate in the fastener area of the RH and/or LH door stay, according to the Operating Cycle below.
OPERATION CYCLE
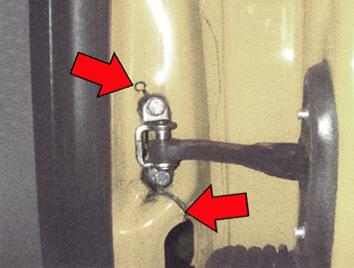
If cracks/breakage are found in the front door A-pillar lining, in the area surrounding the fastener of the RH and/or LH front door stay (see example in Fig. 1), apply a reinforcement plate as follows:
Fig. 1
-
Turn the ignition key to the STOP position.
-
Remove the battery cover, referring to Op. 5530B54 in the Technical Service Manual.
-
Disconnect the negative battery terminal.
-
Remove the door on the concerned side, referred to Op. 7210E36 in the Technical Service Manual.
-
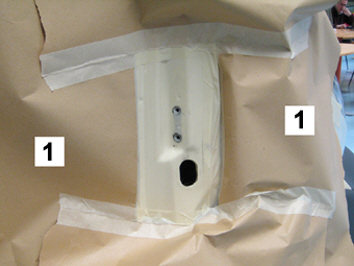
Apply some masking paper (1) on the parts surrounding the involved area.
Fig. 2
-
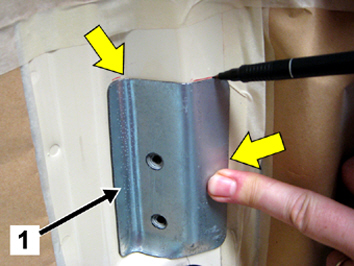
Arrange the reinforcement bracket (1 - Fig. 3) available in the kit 1369782080 centring the slotted holes in the door stay fixing holes.
-
Adapt it on the spot to improve matching with the pillar and mark the overall dimensions, as shown.
Fig. 3
-
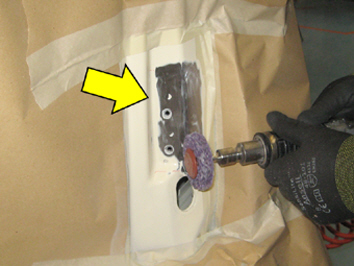
Use a wheel, Scotch Brite (3M) or similar, and remove the paint and the protection primer in the area of the reinforcement plate and in the areas with cracks, as shown in Fig. 4.
Fig. 4
-
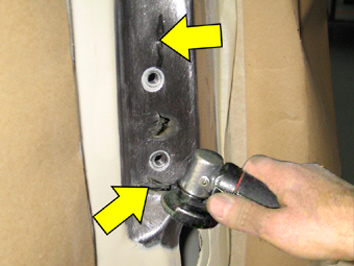
By a suitably sized wheel, clean the cracked areas, removing irregular edges, as shown in Fig. 5.
Fig. 5
-
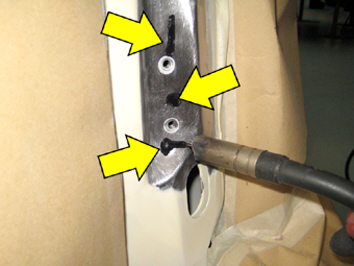
Use a seam welder to fill-weld the holes, as shown in Fig. 6.
Fig. 6
-
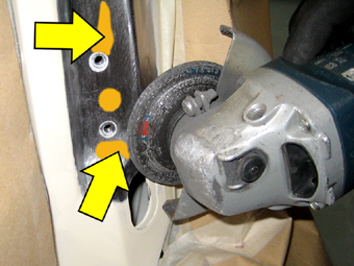
Use a disc wheel and level the weldings, as shown in Fig. 7.
-
Use a rotary brush to clean the previously welded areas.
-
Clean the areas to be painted using a cloth soaked in detergent with a low solvent content (e.g. Glasurit 360-4 or alternative solvents permitted by the regulations in force as for environmental protection).
Fig. 7
-
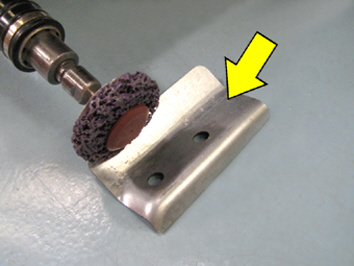
Carefully clean with a Scotch Brite (3M) grinding wheel, or similar, as shown, the internal area of the reinforcement bracket, as shown in Fig. 8;
-
Then clean the surfaces of the reinforcement plate to be painted using a cloth soaked in detergent with a low solvent content (e.g. Glasurit 360-4 or alternative solvents permitted by the regulations in force as for environmental protection).
Fig. 8
-
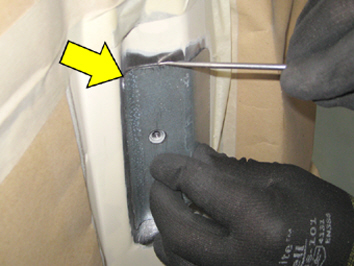
Position the reinforcement bracket and mark the overall dimensions, as shown in Fig. 9;
Fig. 9
-
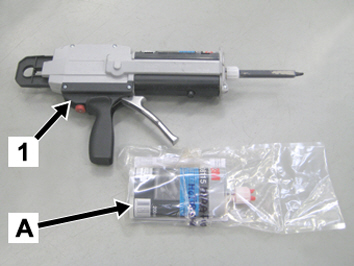
Fit in the application gun (1 - Fig. 10) the cartridges of structural adhesive (A) - type 3M 08115 or ARALDITE 2021/2022 or a similar product.

|
For the use of chemicals closely follow the instructions and warnings on the safety sheet submitted by the supplier to the final user in compliance with the regulations in force in the area (in accordance with Law Decrees 52/97 and 285/98 and subsequent modifications and additions).
Do not touch with bare hands the areas where adhesive is to be laid.
|
Fig. 10
-
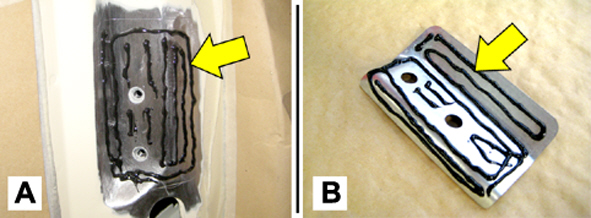
Apply with the gun some beads of structural adhesive on the post (detail A), keeping inside the overall dimensions marked before, and on the reinforcement plate (detail B), as shown in Fig. 11.
|
|
Do not apply adhesive beads too close to the fixing holes, to prevent infiltration inside the pillar and seizing of the screws.
|
Fig. 11
-
Place the reinforcement plate on the pillar centring the holes on the post ones.
-
Temporarily fasten the reinforcement place to the post by the door opening limiter fixing screws.
-
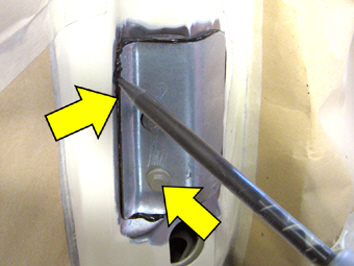
Apply a bead of structural adhesive on the whole contour of the reinforcement plate, as shown in Fig. 14.
Fig. 12
-
Wait until the plate adheres perfectly, according to the suppliers instructions;
-
Once the adhesive has dried, remove the pillar limiter fixing screws;
-
Use suitably-grained sandpaper to level the structural adhesive beam along the contour of the reinforcement bracket
-
Repaint the overhauled area.
-
Protect the threaded holes for stay fixing screws using suitably-sized plugs;
-
Clean the surfaces to be painted using a cloth soaked in detergent with a low solvent content (e.g. Glasurit 360-4 or alternative solvents permitted by the regulations in force as for environmental protection).
-
Suitably mask the areas surrounding the involved area;
-
Apply the 40-50-micron thick corrosion-preventing double-component epoxy primer (e.g. Glasurit by Basf 801-72 VOC or similar).
-
Dry the primer with a drier for about 10 minutes at a temperature of 60°C.
-
Restore the vehicle colour in the overhauled area, using a low temperature product (60°C) dried using an IR lamp for about 15 minutes.
-
Apply a waxy oil product on the internal surfaces of the post box area to be welded.
-
Remove the guards from the bodywork.
-
Refit the front side door, referring to Op. 7210E36 in the Technical Service Manual.
-
Connect the negative battery terminal.
-
Refit the battery cover, referring to Op. 5530B54 in the Technical Service Manual;
PARTS AVALABILITY
|
All concerned models |
Kit of (RH and LH) door pillar reinforcement plates |
1369782080 |
1 |
CLAIM REPORT DATA
|
All concerned models |
7210133 (1) |
1 |
BC |
- |
2.35 (1) |
|
All models in question (*) |
7210134 (2) |
1 |
BC |
- |
3.75 (2) |
|
All concerned models |
7210135 (3) |
1 |
BC |
- |
2.70 (3) |
|
All models in question (*) |
7210136 (4) |
1 |
BC |
- |
4.20 (4) |
(1) Operation Code and Time allowance for one side of the car, RH or LH, only (single-layer painting).
(2) Operation Code and Time allowance for the operation on both sides of the car (single-layer painting).
(3) Operation Code and Time allowance for one side of the car, RH or LH, only (double-layer painting).
(4) Operation Code and Time allowance for the operation on both sides of the car (double-layer painting).
|